Miss [almost] 2 is due for her birthday party, at the end of May. Yay! I'll finally be able to drop the "[almost]" when blogging about her!
We've decided, (well really 'Daddy' aka Mr R decided), on a Teddy Bears Picnic theme. Of course in true style, I always go crazy and foam at the mouth over beautiful blogs, and pretty pictures of other people's insane birthday parties.
Anyway, first thing's first when planning a party... well, other than picking your theme... The invitations!
Here is the invitation I made for Miss [almost] 2's party:We've decided, (well really 'Daddy' aka Mr R decided), on a Teddy Bears Picnic theme. Of course in true style, I always go crazy and foam at the mouth over beautiful blogs, and pretty pictures of other people's insane birthday parties.
Anyway, first thing's first when planning a party... well, other than picking your theme... The invitations!
 |
| Viola! Created Miss {Almost} 2's party invitation, using GIMP. |
❤ Template - I found stiff cardboard was best to make the template out of, so that you can trace the shapes onto the felt.
❤ Felt
❤ Scrapbooking flower and pearls, obviously you can make a 'boyish' version instead with a Top Hat and bow tie.
❤ Scraps of fabric for 'mini pennant'
❤ Photo editing software - I use GIMP which is open source and free to download from here. You can find plenty of tutorials on how to use GIMP online.
No need for glue as you're not sticking it together for the invitation.
 |
| Here's a template I made just for you! Ok, I lie, I didn't make it just for you - but it's there if you want to use it! {Teddy Bear Template} |
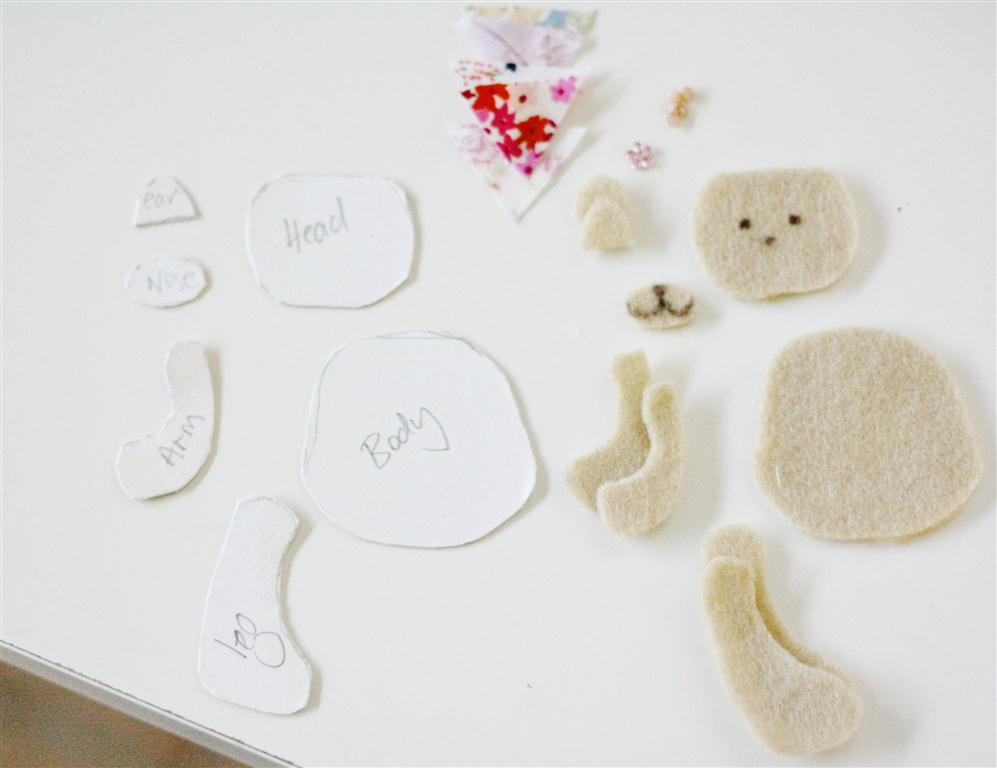 |
| Steps 1, 2, 3 and 4 |
Step 1. Cut out template from stiff cardboard
Step 2. Trace shapes onto felt and cut out
Step 3. Draw some eyes on the 'head' piece, and a nose and mouth on the 'nose' piece. It also helps to put a dot where the 'nose' piece will sit.
Step 4. Cut out mini fabric triangles - I made mine about 2.5cm
Step 2. Trace shapes onto felt and cut out
Step 3. Draw some eyes on the 'head' piece, and a nose and mouth on the 'nose' piece. It also helps to put a dot where the 'nose' piece will sit.
Step 4. Cut out mini fabric triangles - I made mine about 2.5cm
 |
| Steps 5 and 6 |
Step 5. Assemble teddy bear and pennant on a white surface. I just used my desk. Make sure it's somewhere you have good lighting. The teddy measures about 10.5cm in length.
Step 6. Take a NICE photo of the teddy. Don't stress, the felt teddy doesn't get wasted. You'll have to wait for "Teddy Bear's Picnic Part 3 {How to: Make Table Decorations}", to see what I do with them.
Step 7. Upload the photo onto your computer. I did my initial alterations to the photo using Windows Live Photo Gallery. I upped the contrast, brightened it and saturated it slightly.
 |
| Steps 9 and 10 |
Step 8. Open the image in GIMP (or your preferred photo editing software). Select the 'free select' tool, making sure you 'feather' by about 10 pixels. Use the 'free select' tool to outline the teddy and pennant. Then cut.
Step 9. Open a new window, size 2590 x 2300 and paste teddy bear. I also use the smudge tool to lightly go over the edges of the teddy and pennant to make it smoother.
Step 10. Now time to put in the information required and select fonts, the two fonts I used where in a font package I bought online.
Step 11. Save as a JPG file.
Step 12. Open Microsoft Word or equivalent, and place two of your invitation images onto a page, save the file to a thumb drive, and take to your local printing service.
It cost me about $10 to have 20 custom made and original invites printed, not bad!
Step 12. Open Microsoft Word or equivalent, and place two of your invitation images onto a page, save the file to a thumb drive, and take to your local printing service.
It cost me about $10 to have 20 custom made and original invites printed, not bad!
 |
| Blurred the crap out of this printed invite! I think they look super cute, wouldn't you agree? |
No comments:
Post a Comment