Showing posts with label Tutorial. Show all posts

Tuesday, May 3, 2011

Teddy Bear's Picnic Part 3 {How to: Make Table Decorations}

Is is classified as cheating if all you really do is paste a link to something you've done previously, only make a slight alteration, and call it 'new"?

No?

Great!

To make these table decorations, you pretty much follow the same steps as Teddy Bear's Picnic Part 1 {How to: Make Party Invitations} - only this time you stick it all to cardboard!  :D

Aww

These little felt teddies are super cute!


I'm aiming to make about six of these cute little table decorations - all with something different on them, like "Beary Nice Biscuits", "Teddy Treats", and so on and so forth.

Don't worry, I'm fully aware that the gang of 2 year olds will not appreciate them... but I'm OK with that! 

Monday, May 2, 2011

Teddy Bear's Picnic - Part 2 {How to: Make 'no-sew' Pennant}

This ‘no sew’ pennant is very easy to make.

This is actually one of the ‘Hand-made
Home-made’ gifts I’m making, and it will be apart of Miss [almost] 2's birthday present. Some of the fabrics I’ve utilised in this project are the same ones I used making her quilt, so they will tie in nicely together, without being too similar.

The pennant will not only make a nice addition to her bedroom, but it will also make a nifty decoration for her ‘Teddy Bears Picnic’ themed birthday party.

Get your shit together woman!

Dodgy template, cut out from a piece of A4 paper.

Scrap material, re-purposed old clothes, and old bed sheets for the fabric.

Bias binding, the widest I could buy. {I've made this pennant 10 metres, the binding is $1.30AU per metre. } 

Spray glue, decent brand. I used Bostik.

Sewing machine. HAH! I lied, there is sewing involved! OK, so I twisted the truth a little...  [insert evil laugh]


Pin the flags to bias binding - Ready for sewing


It's pretty straight forward...
Do most of my sewing in
the 'bat cave' at night,
to avoid a certain 'little helper'.

Step 1. Make template. Well dur!

Step 2. Cut out lots of triangles. Mine were approximately 19cm wide x 22cm long. 

Step 3. Pin the fabric triangle in between the folded bias binding and sew together. 

Step 4. Spray the glue over the back of the fabric triangles and let dry. Try not to make it too thick as you don't want the fabric to be stiff, just enough to stop the material from fraying. *Best to take step 4 outside.


I used coat hangers on
my clothes line,to prevent
the line from getting sticky.
Hang pennant up on clothes line,  and trim loose threads.

I hung an old painting sheet behind the pennant, and laid some more painting sheets on the ground, to protect the area from spray glue.

Be careful to only spray the pennants that are open straight - you do not want them glued to themselves, or another piece of fabric for that matter.

I didn't see any other tutorials that did the no-sew the same way, so I can't vouch that it is entirely fool proof, but it worked for me. So please don't send me hate mail because your pennant didn't work out for you. :P


End result in Miss [almost] 2's room.


If you found this helpful why not leave a comment, and let me know!

Thursday, April 7, 2011

Teddy Bear's Picnic Part 1 {How to: Make Invitation}

Miss [almost] 2 is due for her birthday party, at the end of May. Yay! I'll finally be able to drop the "[almost]" when blogging about her!

We've decided, (well really 'Daddy' aka Mr R decided), on a Teddy Bears Picnic theme. Of course in true style, I always go crazy and foam at the mouth over beautiful blogs, and pretty pictures of other people's insane birthday parties.

Anyway, first thing's first when planning a party... well, other than picking your theme... The invitations!
 
Here is the invitation I made for Miss [almost] 2's party:
Viola! Created Miss {Almost} 2's party invitation, using GIMP.

You'll need:
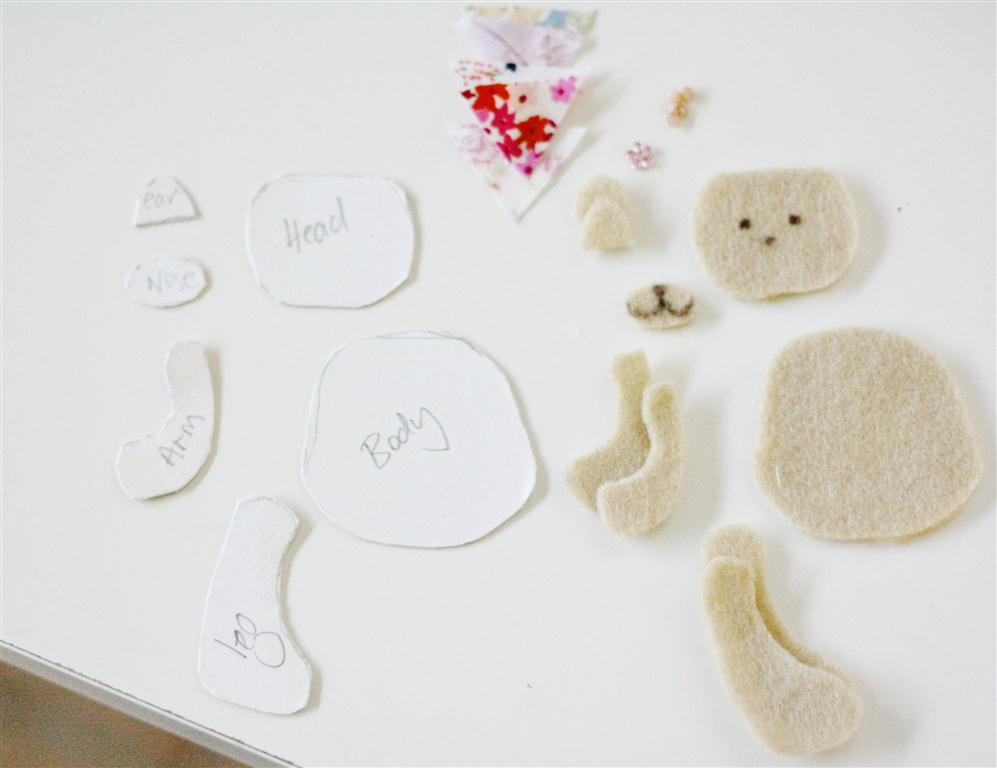
Template - I found stiff cardboard was best to make the template out of, so that you can trace the shapes onto the felt.
Felt 
Scrapbooking flower and pearls, obviously you can make a 'boyish' version instead with a Top Hat and bow tie.
Scraps of fabric for 'mini pennant' 
Photo editing software - I use GIMP which is open source and free to download from here. You can find plenty of tutorials on how to use GIMP online.


No need for glue as you're not sticking it together for the invitation.


Here's a template I made just for you! Ok, I lie, I didn't make it just for you - but it's there if you want to use it! {Teddy Bear Template}


Steps 1, 2, 3 and 4
Step 1. Cut out template from stiff cardboard

Step 2. Trace shapes onto felt and cut out

Step 3. Draw some eyes on the 'head' piece, and a nose and mouth on the 'nose' piece. It also helps to put a dot where the 'nose' piece will sit.

Step 4. Cut out mini fabric triangles - I made mine about 2.5cm


Steps 5 and 6


Step 5. Assemble teddy bear and pennant on a white surface. I just used my desk. Make sure it's somewhere you have good lighting. The teddy measures about 10.5cm in length.

Step 6. Take a NICE photo of the teddy. Don't stress, the felt teddy doesn't get wasted. You'll have to wait for "Teddy Bear's Picnic Part 3 {How to: Make Table Decorations}", to see what I do with them.

Step 7. Upload the photo onto your computer. I did my initial alterations to the photo using Windows Live Photo Gallery. I upped the contrast, brightened it and saturated it slightly.


Steps 9 and 10

Step 8. Open the image in GIMP (or your preferred photo editing software). Select the 'free select' tool, making sure you 'feather' by about 10 pixels. Use the 'free select' tool to outline the teddy and pennant. Then cut.

Step 9. Open a new window, size 2590 x 2300 and paste teddy bear. I also use the smudge tool to lightly go over the edges of the teddy and pennant to make it smoother.

Step 10. Now time to put in the information required and select fonts, the two fonts I used where in a font package I bought online.

Step 11. Save as a JPG file.

Step 12. Open Microsoft Word or equivalent, and place two of your invitation images onto a page, save the file to a thumb drive, and take to your local printing service.

It cost me about $10 to have 20 custom made and original invites printed, not bad!


Blurred the crap out of this printed invite! I think they look
super cute, wouldn't you agree?


Related Posts Plugin for WordPress, Blogger...