Showing posts with label Craft. Show all posts

Thursday, May 5, 2011

Mothers Day For Granny

I should just make a blog label dedicated solely to Granny posts - don't fret, this will be the last one for a while. 

You guys are so going to
get sick of me
flogging this picture
!


I didn't actually intend on blogging about this gift, but I thought, "what the hell!"...

The card I made for Granny aka M.I.L


The card was very simple to make - I just pulled apart some old artificial flowers, and 'sewed' them all onto some cardboard with a button. I also sprayed some glue very lightly under the flowers to help them stick better to the cardboard.

On the inside of the card, where the thread is tied, I sketched a gift box with lead pencil. Surprisingly enough I restrained myself from drawing stick figure people.

As for the gift we're sending, I thought some photos printed from her recent visit would be nice. The photo frames we used are second-hand; they'd been collecting dust for about 4 years in my wardrobe. Sorry Granny, but we're broke! It was a team effort - I had two photos enlarged, while Mr.R gave the frames a much needed clean up.

*Let's just pretend that these photographs
are in black frames, because I had
already packed them up before I started this post.

The kids are unwell, as we've had a bout of tonsillitis going around the house, so they didn't feel up to writing a letter to Granny. Oh well... perhaps next time.

Granny not only gets some second-hand photo frames, she also gets lumped with a reject 'birthday invitation gone wrong' off cut, saying "Hi"...

She won't believe her luck! lol

Mothers Day gift all wrapped up, ready to go -
now to get off my arse and post it

Do any of you make gifts for someone special on Mothers day?

Tuesday, May 3, 2011

Teddy Bear's Picnic Part 3 {How to: Make Table Decorations}

Is is classified as cheating if all you really do is paste a link to something you've done previously, only make a slight alteration, and call it 'new"?

No?

Great!

To make these table decorations, you pretty much follow the same steps as Teddy Bear's Picnic Part 1 {How to: Make Party Invitations} - only this time you stick it all to cardboard!  :D

Aww

These little felt teddies are super cute!


I'm aiming to make about six of these cute little table decorations - all with something different on them, like "Beary Nice Biscuits", "Teddy Treats", and so on and so forth.

Don't worry, I'm fully aware that the gang of 2 year olds will not appreciate them... but I'm OK with that! 

Monday, May 2, 2011

Teddy Bear's Picnic - Part 2 {How to: Make 'no-sew' Pennant}

This ‘no sew’ pennant is very easy to make.

This is actually one of the ‘Hand-made
Home-made’ gifts I’m making, and it will be apart of Miss [almost] 2's birthday present. Some of the fabrics I’ve utilised in this project are the same ones I used making her quilt, so they will tie in nicely together, without being too similar.

The pennant will not only make a nice addition to her bedroom, but it will also make a nifty decoration for her ‘Teddy Bears Picnic’ themed birthday party.

Get your shit together woman!

Dodgy template, cut out from a piece of A4 paper.

Scrap material, re-purposed old clothes, and old bed sheets for the fabric.

Bias binding, the widest I could buy. {I've made this pennant 10 metres, the binding is $1.30AU per metre. } 

Spray glue, decent brand. I used Bostik.

Sewing machine. HAH! I lied, there is sewing involved! OK, so I twisted the truth a little...  [insert evil laugh]


Pin the flags to bias binding - Ready for sewing


It's pretty straight forward...
Do most of my sewing in
the 'bat cave' at night,
to avoid a certain 'little helper'.

Step 1. Make template. Well dur!

Step 2. Cut out lots of triangles. Mine were approximately 19cm wide x 22cm long. 

Step 3. Pin the fabric triangle in between the folded bias binding and sew together. 

Step 4. Spray the glue over the back of the fabric triangles and let dry. Try not to make it too thick as you don't want the fabric to be stiff, just enough to stop the material from fraying. *Best to take step 4 outside.


I used coat hangers on
my clothes line,to prevent
the line from getting sticky.
Hang pennant up on clothes line,  and trim loose threads.

I hung an old painting sheet behind the pennant, and laid some more painting sheets on the ground, to protect the area from spray glue.

Be careful to only spray the pennants that are open straight - you do not want them glued to themselves, or another piece of fabric for that matter.

I didn't see any other tutorials that did the no-sew the same way, so I can't vouch that it is entirely fool proof, but it worked for me. So please don't send me hate mail because your pennant didn't work out for you. :P


End result in Miss [almost] 2's room.


If you found this helpful why not leave a comment, and let me know!

Monday, April 25, 2011

Where All The Action Happens! {Our Play Room}

Our 'Play Room' - Thought it was time to dish out some posts I've had sitting in my drafts folder.

We use our rumpus room as the kids 'Play Room'. It wasn't easy to create a space for a Teen, tween, and toddler combination.

You and I both know that this isn't the way our play room normally looks - picture this room completely trashed. That's the way it ought to be, right!


Corner cupboard stores board games and puzzles 
Hallway table stores toddler toys and
underneath stores the keyboard.

If you've followed my blog or are just one of my friends stalking me, you know I'm a thrift freak - I can tell you it doesn't have to cost the earth to set up a play room. It would have only cost around $140 to furnish this room.

Your main battle will be finding the space, which we are very spoilt to have ample.


Everyone needs a table and chairs, and with a teen almost the same height as me (5'8") teeny tiny stuff is out - we need the Real McCoy now. 


Craft Cupboard - This stores all the goodies and dress ups.
Plastic drawers for more toys, blocks and Lego
- lots and lots of Lego!


Miss [almost] 2's inside play area is in the corner of the play room, placed next to a nice big window for natural light. Miss [almost] 2 sits here to have her morning tea sometimes, hence the vacuum cleaner.


Note the strategically placed vacuum cleaner -
it gets used so much, I rarely even bother packing it away.


So now when you see a post  on my blog of painted windows, contact 'stained glass', or a handmade birthday card  - you know where all the action is happening... our play room.

Granny Tribute! (oh, and Daddy's birthday)

Well as the title suggests, Grandparents are awesome and Granny {MIL} came to visit us over the Easter break!

Really, I'm just going to brag about my MIL so you will be envious of how good I've got it! [insert smug look]

Mr R on his birthday with 'Mummy'- He is such a ratbag and I wouldn't want him any other way...

We've had an 'eventful' week... I could lie and say it's been 'fabulous', but the truth is it sucks when you're unwell. Yep, I think I had the dreaded.... [whispers] 'man-flu' - for the life of me I couldn't stop complaining!

Poor Granny, she was stuck here for 5  l o n g  days, with myself and Mr R sick. I have to say it was nice to have someone here to justify my need for chocolate. Husbands just don't 'get it'.


It was a bit of a bummer, Mr. R had his birthday on Friday, which turned out to be pretty lame, because we were unwell [and poor]. 

We did stop off at the 'beach', which is, come to think of it, more like a mangrove.


Anyway, having Granny here was a great excuse to pull the camera out and start clicking....


'Deception Bay' - looking very... deceptive.


In my defense, I was sick, it was about 11am, and the sun was in full swing. I don't own any fancy filters or lenses - only my trusty 50mm and two zoom lenses that came with the camera.

That isn't sand, that's mud - so soft and fine,
you could shovel it up and use it as a mud pack

We also did the "stock standard" photos in the back yard, of Granny with the kids. As you do.

Granny with her 'minions'


Ms 13 and Master 9 have had Granny and Grandad in their lives since they were 7 and 3. It's nice to think that Master 9 wouldn't remember a time without them in his life. Very special.

Granny is one of those people who genuinely loves children (well, to some point). Granny is a kindergarten teacher, so you can imagine that some days she probably loathes school and snotty little children.

One thing the kids and I love about Granny, is that she is a firm believer in 'play comes first and housework comes later', so it's always fun to have Granny around.

Yep, I must have the only MIL who doesn't check for dust! Really, it's just like having another big kid here. Awesome! 


Miss [almost] 2 is their first paternal grandchild, but they've already built up their grand-parenting skill set years prior to little missy coming along. 

Aside from my immediate family (husband and children), I really only have my mother left - all my grandparents passed away when I was younger, and I never grew up with aunts, uncles and cousins.

I can't stress enough the importance of extended family, especially grandparents.


We would love to drive down sometime this year to visit Mr. R's Grandparents 'Nanna and Pop', so they can meet Miss [almost] 2 in person - not just by photos...


Everyone's sad when Granny has to go home...


Sunday, April 24, 2011

Teaching The Kids How To Vandalise, Yay! {Window Painting}

Who would have thought vandalising could be so much fun! Can't take credit for this, I 'yoinked' the idea from Childhood 101 - Christie and the team over there are just amazing!

Miss [almost] 2 working her magic.


Master 9 "In the zone" - He is such
a character...


We had so much fun as a family painting the window, it even felt a bit rebellious!!

This totally gives away I'm Virgo right?


Mr R and I dug out some basic poster paints from the craft cupboard and set Miss [almost] 2 and Master 9 up to start being little vandals.

I'm still unsure if the paint will actually come off the windows, but it's our house so we don't care if it does or not.


Wasn't long before Ms 13 joined in the fun after her morning walk with Granny


This lovely family activity will more than likely backfire on me, I'm certain I could see it ticking over in Miss [almost] 2's mind, pondering what she could deface next.


Ms 13  Geez-Whiz I love that girl to pieces!


One day there will be no more cheery
pictures being drawn on my windows,
they'll all be grown up


Eat your heart out  Michelangelo

Tuesday, April 12, 2011

10am And Still In Our Pj's, Doing Arty Farty Stuff

I spotted this brilliant idea on {Adventures with Kids}, Catherine is a genius at finding activities to do with kiddies - love reading her blog!

We had a go at her "stained glass window collages", but instead did a heart-shaped theme. Was loads of fun, even Miss [almost] 2 got into it.

Top to Bottom: Master 9's, Ms 13's, Mine and Miss [almost] 2's


Even I had heaps of fun!


Quick! Take a photo, they're getting along!! Oh wait, I did take a photo... phew!


None of us slept very well last night, not sure why, perhaps a full moon soon? Or, just maybe, it could be from the sugar overload we had the day before!!!


Miss [almost] 2 kept going to the window to check out her awesome work...

It's such an easy project to do with the kids, even little ones. I will no doubt do this again, with the kids soon. Perhaps as some birthday party decorations?


::::


Note: After cutting the shape out, I peel the contact backing off and cut the centre out, then place the rim piece back onto the contact.

This will help prevent
bits of glitter, and goodness knows what else from sticking to the outer edge. I found the edge helped it stick better on the window, and little fingers couldn't peel it off either.
   

Thursday, April 7, 2011

Teddy Bear's Picnic Part 1 {How to: Make Invitation}

Miss [almost] 2 is due for her birthday party, at the end of May. Yay! I'll finally be able to drop the "[almost]" when blogging about her!

We've decided, (well really 'Daddy' aka Mr R decided), on a Teddy Bears Picnic theme. Of course in true style, I always go crazy and foam at the mouth over beautiful blogs, and pretty pictures of other people's insane birthday parties.

Anyway, first thing's first when planning a party... well, other than picking your theme... The invitations!
 
Here is the invitation I made for Miss [almost] 2's party:
Viola! Created Miss {Almost} 2's party invitation, using GIMP.

You'll need:
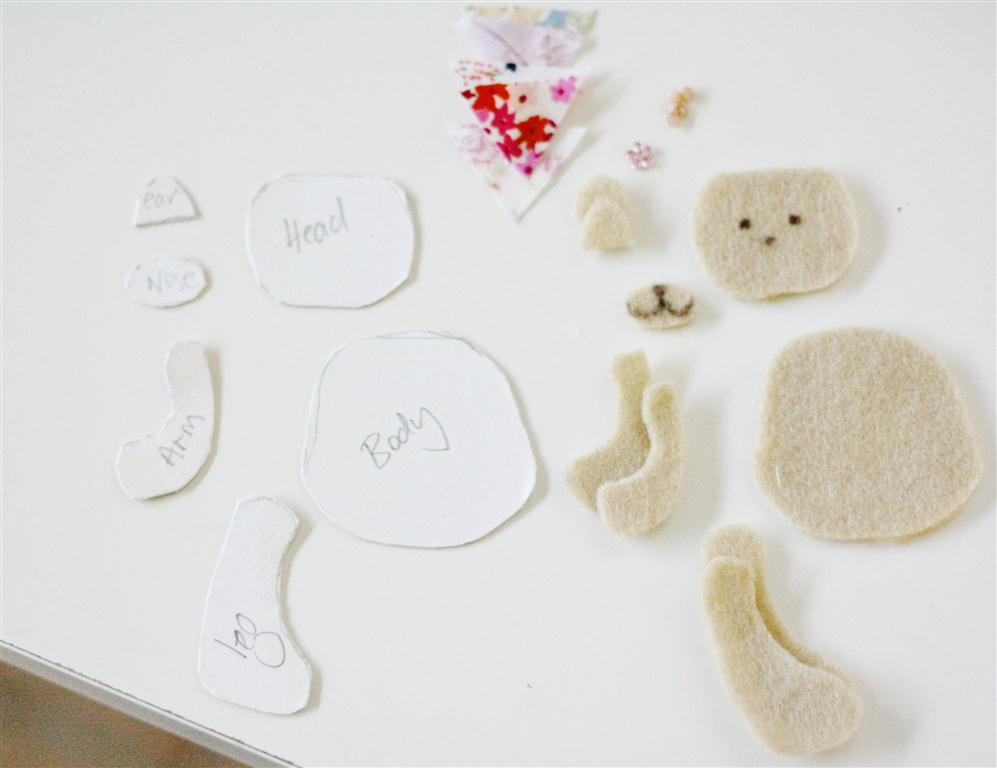
Template - I found stiff cardboard was best to make the template out of, so that you can trace the shapes onto the felt.
Felt 
Scrapbooking flower and pearls, obviously you can make a 'boyish' version instead with a Top Hat and bow tie.
Scraps of fabric for 'mini pennant' 
Photo editing software - I use GIMP which is open source and free to download from here. You can find plenty of tutorials on how to use GIMP online.


No need for glue as you're not sticking it together for the invitation.


Here's a template I made just for you! Ok, I lie, I didn't make it just for you - but it's there if you want to use it! {Teddy Bear Template}


Steps 1, 2, 3 and 4
Step 1. Cut out template from stiff cardboard

Step 2. Trace shapes onto felt and cut out

Step 3. Draw some eyes on the 'head' piece, and a nose and mouth on the 'nose' piece. It also helps to put a dot where the 'nose' piece will sit.

Step 4. Cut out mini fabric triangles - I made mine about 2.5cm


Steps 5 and 6


Step 5. Assemble teddy bear and pennant on a white surface. I just used my desk. Make sure it's somewhere you have good lighting. The teddy measures about 10.5cm in length.

Step 6. Take a NICE photo of the teddy. Don't stress, the felt teddy doesn't get wasted. You'll have to wait for "Teddy Bear's Picnic Part 3 {How to: Make Table Decorations}", to see what I do with them.

Step 7. Upload the photo onto your computer. I did my initial alterations to the photo using Windows Live Photo Gallery. I upped the contrast, brightened it and saturated it slightly.


Steps 9 and 10

Step 8. Open the image in GIMP (or your preferred photo editing software). Select the 'free select' tool, making sure you 'feather' by about 10 pixels. Use the 'free select' tool to outline the teddy and pennant. Then cut.

Step 9. Open a new window, size 2590 x 2300 and paste teddy bear. I also use the smudge tool to lightly go over the edges of the teddy and pennant to make it smoother.

Step 10. Now time to put in the information required and select fonts, the two fonts I used where in a font package I bought online.

Step 11. Save as a JPG file.

Step 12. Open Microsoft Word or equivalent, and place two of your invitation images onto a page, save the file to a thumb drive, and take to your local printing service.

It cost me about $10 to have 20 custom made and original invites printed, not bad!


Blurred the crap out of this printed invite! I think they look
super cute, wouldn't you agree?


Tuesday, April 5, 2011

Granny's Birthday

What do you buy someone who already has everything? [sighs] My mother-in-law lives around a 1000 kilometres away from us, and to many this is a godsend, I must be the only person on earth who actually likes loves their 'monster-in-law'! LOL   
 

This year, I've resorted to a handmade card, along with a DVD with over 800 photos of the kids, placed in a shoe box that's been wrapped in pretty gift wrap.


Don't forget to decorate the DVD. I do have one of those fancy DVD label makers, but I still think the daggy little stick person drawing of the grandkids on it is just as effective.

Photo DVD: Check out the awesome artwork LOL


+

Certainly looks home-made...  [smirks]


+

Ms 13 and Master 9 each wrote Granny a short letter and Miss [almost] 2 drew a lovely picture, which were placed in separate envelopes along with the card and DVD.


=

Happy Granny!
 
Note: Lucky for me she doesn't frequent the internet or my blog to dispute this illustration.

Tuesday, March 8, 2011

In Retrospect


This picture was taken almost 10 years ago. Ms 13 was four, I remember we spent the afternoon painting old formula tins - made some pretty fabulous pot plants out of them. Wish I could go back, to that simple lifestyle on the sunny coast. [minus the ex-husband]
Related Posts Plugin for WordPress, Blogger...